

I'm following this guide from a US 8th gen civic site.
It shows how to make a homemade aux-in cable that put in the civic (my 06 4dr, doesn't have one).
I first pulled my dash apart to get the HU (brute force stylee") )
)
When I got it out I found the CD changer was using the connection I needed, so the cable I had made wouldn't fit. (The connection is the 20pin B connection)
So what I need to know is how can I get a connector block like the 20 pin one so I can make the cable fit?
I've added the guide I used to make the cable for reference (by the way all credit for it goes to chok on 8thCivic.com)
--------
![Image]()
AUX for non US model
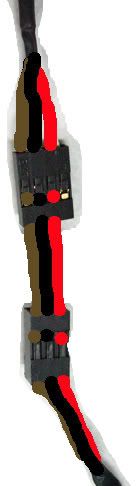
1. Get the cable as shown in the fig. or any cable you can find. The cable I used is the one that came with the optical drive for PC. The cable is just fit the connector of the head unit. So it is really easy, no soldering needed.
![Image]()
![Image]()
2. Here is the pins assignment from Honda taken from Civic-EU model (this would be the same for all Civic as it exactly the same for my Civic-Thailand model)
B3 = AUX SGND (ground for the signal)
** = AUX SH GND (shielding ground for preventing the signal interference from other devices)
B5 = AUX GND (AUX detection wire for switched type female jack)
B13= AUX L (Left signal)
B14 =AUX R (Right signal)
B15 = AUX DET (AUX detection wire for switched type female jack)
I'm really sure about the pins assignment but I'm not sure about the function of those pins.
![Image]()
3. This step you need one CD-Rom cable with a socket taken from another cable. Route the wires as shown in the fig.
![Image]()
4. This step will finish the AUX cable but you would think about where to place this thing in your car. So you should skip this step and go to step#5-6 then get back to complete this step.
![Image]()
Connect the other end to the mini-jack cable by inserting three pieces of hard wire between those female socket. Now you are done with the AUX cable.
![Image]()
![Image]()
5. I would suggest you to hide this cable in the transmission pocket. Remove the pocket and route the wire as shown in fig.
![Image]()
![Image]()
6. Route the wire as shown in fig. Then go to step#4
![Image]()
Congratulation! you now have the AUX.
It shows how to make a homemade aux-in cable that put in the civic (my 06 4dr, doesn't have one).
I first pulled my dash apart to get the HU (brute force stylee
)When I got it out I found the CD changer was using the connection I needed, so the cable I had made wouldn't fit. (The connection is the 20pin B connection)
So what I need to know is how can I get a connector block like the 20 pin one so I can make the cable fit?
I've added the guide I used to make the cable for reference (by the way all credit for it goes to chok on 8thCivic.com)
--------
1. Get the cable as shown in the fig. or any cable you can find. The cable I used is the one that came with the optical drive for PC. The cable is just fit the connector of the head unit. So it is really easy, no soldering needed.


2. Here is the pins assignment from Honda taken from Civic-EU model (this would be the same for all Civic as it exactly the same for my Civic-Thailand model)
B3 = AUX SGND (ground for the signal)
** = AUX SH GND (shielding ground for preventing the signal interference from other devices)
B5 = AUX GND (AUX detection wire for switched type female jack)
B13= AUX L (Left signal)
B14 =AUX R (Right signal)
B15 = AUX DET (AUX detection wire for switched type female jack)
I'm really sure about the pins assignment but I'm not sure about the function of those pins.

3. This step you need one CD-Rom cable with a socket taken from another cable. Route the wires as shown in the fig.

4. This step will finish the AUX cable but you would think about where to place this thing in your car. So you should skip this step and go to step#5-6 then get back to complete this step.

Connect the other end to the mini-jack cable by inserting three pieces of hard wire between those female socket. Now you are done with the AUX cable.

5. I would suggest you to hide this cable in the transmission pocket. Remove the pocket and route the wire as shown in fig.


6. Route the wire as shown in fig. Then go to step#4

Congratulation! you now have the AUX.


