
‘How to’ :Fitting an after market heated seat kit to an 8th Gen civic
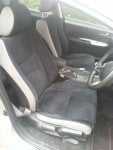
I know some of you have leather already, but to me it was going to be a massive upgrade to velour seats. So, I purchased a complete set including the seats, switches, door cards and centre arm rest.
current velour seats...
![Image]()
and the seats are changed.....
I will get the hairdryer out (to remove the creases) and some decent leather cleaner-moisturiser and they should come up real nice, fingers crossed Done the centre console, but still got to do the leather door cards
![Image]()
![Image]()
I was really pleased with them but wanted the heated elements working. Unfortunately, each civic is given a loom based on what it has as its OEM spec rather than a generic one. This means that if a civic does not have heated seats from the factory, then there is absolutely nothing to link them to within the car when putting 2nd hand ones in. The costs involved in getting an auto electrician or Honda themselves to do it was silly ..... so I decided to do it myself. There are many kits available on ebay etc so for £50 I decided to get some and fit them.
The following is a 'how to' of how I fitted them to my leather seats, but if you have velour ones it will be the same as I checked me velour ones in each step before doing the same to my new leather ones (except they will not have heating elements in them when you remove the cover of course!)
Before doing anything, disconnect the battery. Remove the front seats by sliding them backwards and removing the two front bolts, then forwards and removing the rear two. Tip them backwards and unclip the wires from underneath (I took photos on my phone of everything before undoing it so that I had a record of where everything went back). Take them out and then the fun begins .....
Passenger seat first - remove the back of the seat by starting at the bottom right hand corner and working to the top. The top section has three tabs which can be unclipped by pulling the back downwards. The bottom has two plastic clips that are VERY hard to remove!
![Image]()
once unclipped, flip the seat onto its side and unclip the back from underneath...
![Image]()
Next, remove the plastic cover from the handle on the side of the seat. This is done using brute force - its the only way! I used a rubber camping mallet, knocking the plastic cover until it pops off.
![Image]()
the side cover can then be undone....
![Image]()
once off, you can remove the corner plastic trim...
![Image]()
and see the plastic clips that hold on the seat cover. This is the same for the leather ones in these photos and my old material ones...
![Image]()
at the front, the plastic clip runs the entire length. The best place to get into it is under here....
![Image]()
get a small screw driver and place it between the rail and the clip and then run it forwards... it will peel the clip off as you go....
![Image]()
once done you can curl back the seat cover from the seat base. However you will not go far before you get to the clips that hold the seat cover onto the foam and these are a PITA!
![Image]()
It took me a while to get the hang of removing these clips - the are really hard work and kill your fingers! Anyway - the best way is to hold the foam back away from the larger side of the clip so that it can rotate. Then place a screwdriver under the larger side of the clip and pull upwards, rotating it until it pops off the metal wire it is held to. It takes a bit of practice but it is definitely the easiest way to undo them.
![Image]()
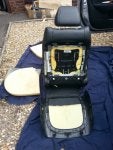
Work towards the back of the seat until you have uncovered enough of the seat for your new heating element... this is the old one in mine still in place and you can see the clips on the sides and across the middle of the seat
![Image]()
this can then be removed and the new element put across the foam, pushing it down into the crease, cutting this out and then replacing the cover (This can been seen in the photos of the seat back).
Seat bottom cut outs....
![Image]()
and the element in place
![Image]()
I put the new element in from the back, so the wires come out from the rear... don't worry, this is covered by the material from the seat back
![Image]()
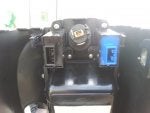
So the seat base is done.... then on to the seat back. This involves removing the airbag from the side.... 4 bolts, one on the outside at the top, one on the outside at the bottom and 2 inside....
![Image]()
![Image]()
![Image]()
once unbolted I just placed the airbag canister onto the floor behind the seat and worked with it still plugged into the seat.
![Image]()
the seat back material can be unhooked from the bottom. I just lifted mine high enough to expose the area my element would cover.... of course, there are still loads of foam clips to unhook on the way!
old element....
![Image]()
new element pushed into the crease ready to be marked and have the section cut out....
![Image]()
once done, route the cable through the back again next to the wires from the base element.
Then put everything back how it was by doing the reverse of taking it apart
Then onto the drivers seat ... the only difference is that there is the extra handle to deal with, but other than that it is exactly the same ....
The extra handle can be removed by popping the outer plastic cover off to expose the screws you need to take out...
![Image]()
![Image]()
Once you have put the elements into both seats, pop your seats back into the car but DO NOT bolt them back down yet, you still need to route the power cables and test them.
Next job was to find a way through the bulkhead to get power from the battery. I used the same grommet entrance that people have used for their amp wires. This is situated on the passenger side, behind the air filter in the 2.2. I removed the battery, battery tray and the air filter box to reveal the grommet and managed to get the 2 power wires through (in the end!). These then run into the car below the glove box. It is not easy to do so BE CAREFUL! There are wires running through the grommet and you do not want to damage them. I used a blunt screwdriver with some elephant tape over the end as protection for the wires, and pushed it through the grommet. I was then able to get under the glove box to feel the end of it. Once I was sure I could pull the cable through, I taped them to the screw driver and pushed it through again, removing them from the screwdriver on the glove box side and pulling them through.
![Image]()
I then routed the wires to the central console and from there, sideways under the carpet on the floor of the car just below the where it ramps up to the seat area and then up under the seats coming through where the airbag wires appear. I then connected everything up to test it before starting to fix things in properly...
![Image]()
The result ....nice toastie seats!
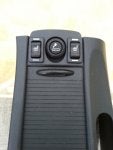
Happy that they were working, I was then able to work on getting the buttons into the central console. As I had bought the entire leather interior, the new console already had heater switches but they were obviously not compatible with the new system. What was good though is that the blank holes in the console were almost a perfect fit for the new switches (if you have the blanking plate you will still have the same holes).
remove the old switches (or blanking plate if you do not have switches)...
![Image]()
The new switch that came with my kit is virtually identical in size to the hole, but is 'square cornered'...
![Image]()
so, with a sharp stanley knife (the plastic is soft and thin) square off the 4 corners of the hole you have. Do not make it any larger, just square cornered.... one switch fitted and the other hole done.....
![Image]()
then just push the new switches in until the brackets click into place. Remember to do them the correct way up!
![Image]()
and then fit into the car and retest! here are mine working (orange light comes on when they are working) This kit has two heat settings, rocking forward and back with 'off' being the level position.
![Image]()
and there we have it, job done! Ok, so in summer when you fit them you might not appreciate it much.... but in February you will! Apparently material seats heat up faster, so a good mod if you have those too....
Wiring was nice and simple. Loom was made up of a Power wire (fused) from the battery and a ground which was connected to a bolt by the handbrake and then the switches and elements just plug into those. Of course the above ‘How to ‘ shows you how to fit the kit you have into civic seats, each ‘heated seat kit’ will need to have its instructions following very carefully when installing to make sure you complete the wiring as they state.
Good luck and enjoy the warmth
Addendum: I fitted these last summer and have been using them most days over the winter. They are superb! I was worried that they would not be warm enough, but they are great. Heat setting 1 takes about 5 mins to get to full heat and is lovely and warm. Setting 2 heats up faster but is too warm to have on for long.
I hope this is of use
I know some of you have leather already, but to me it was going to be a massive upgrade to velour seats. So, I purchased a complete set including the seats, switches, door cards and centre arm rest.
current velour seats...
and the seats are changed.....
I will get the hairdryer out (to remove the creases) and some decent leather cleaner-moisturiser and they should come up real nice, fingers crossed
Done the centre console, but still got to do the leather door cards I was really pleased with them but wanted the heated elements working. Unfortunately, each civic is given a loom based on what it has as its OEM spec rather than a generic one. This means that if a civic does not have heated seats from the factory, then there is absolutely nothing to link them to within the car when putting 2nd hand ones in. The costs involved in getting an auto electrician or Honda themselves to do it was silly ..... so I decided to do it myself. There are many kits available on ebay etc so for £50 I decided to get some and fit them.
The following is a 'how to' of how I fitted them to my leather seats, but if you have velour ones it will be the same as I checked me velour ones in each step before doing the same to my new leather ones (except they will not have heating elements in them when you remove the cover of course!)
Before doing anything, disconnect the battery. Remove the front seats by sliding them backwards and removing the two front bolts, then forwards and removing the rear two. Tip them backwards and unclip the wires from underneath (I took photos on my phone of everything before undoing it so that I had a record of where everything went back). Take them out and then the fun begins .....
Passenger seat first - remove the back of the seat by starting at the bottom right hand corner and working to the top. The top section has three tabs which can be unclipped by pulling the back downwards. The bottom has two plastic clips that are VERY hard to remove!
once unclipped, flip the seat onto its side and unclip the back from underneath...
Next, remove the plastic cover from the handle on the side of the seat. This is done using brute force - its the only way! I used a rubber camping mallet, knocking the plastic cover until it pops off.
the side cover can then be undone....
once off, you can remove the corner plastic trim...
and see the plastic clips that hold on the seat cover. This is the same for the leather ones in these photos and my old material ones...
at the front, the plastic clip runs the entire length. The best place to get into it is under here....
get a small screw driver and place it between the rail and the clip and then run it forwards... it will peel the clip off as you go....
once done you can curl back the seat cover from the seat base. However you will not go far before you get to the clips that hold the seat cover onto the foam and these are a PITA!
It took me a while to get the hang of removing these clips - the are really hard work and kill your fingers! Anyway - the best way is to hold the foam back away from the larger side of the clip so that it can rotate. Then place a screwdriver under the larger side of the clip and pull upwards, rotating it until it pops off the metal wire it is held to. It takes a bit of practice but it is definitely the easiest way to undo them.
Work towards the back of the seat until you have uncovered enough of the seat for your new heating element... this is the old one in mine still in place and you can see the clips on the sides and across the middle of the seat
this can then be removed and the new element put across the foam, pushing it down into the crease, cutting this out and then replacing the cover (This can been seen in the photos of the seat back).
Seat bottom cut outs....
and the element in place
I put the new element in from the back, so the wires come out from the rear... don't worry, this is covered by the material from the seat back
So the seat base is done.... then on to the seat back. This involves removing the airbag from the side.... 4 bolts, one on the outside at the top, one on the outside at the bottom and 2 inside....
once unbolted I just placed the airbag canister onto the floor behind the seat and worked with it still plugged into the seat.
the seat back material can be unhooked from the bottom. I just lifted mine high enough to expose the area my element would cover.... of course, there are still loads of foam clips to unhook on the way!
old element....
new element pushed into the crease ready to be marked and have the section cut out....
once done, route the cable through the back again next to the wires from the base element.
Then put everything back how it was by doing the reverse of taking it apart
Then onto the drivers seat ... the only difference is that there is the extra handle to deal with, but other than that it is exactly the same ....
The extra handle can be removed by popping the outer plastic cover off to expose the screws you need to take out...
Once you have put the elements into both seats, pop your seats back into the car but DO NOT bolt them back down yet, you still need to route the power cables and test them.
Next job was to find a way through the bulkhead to get power from the battery. I used the same grommet entrance that people have used for their amp wires. This is situated on the passenger side, behind the air filter in the 2.2. I removed the battery, battery tray and the air filter box to reveal the grommet and managed to get the 2 power wires through (in the end!). These then run into the car below the glove box. It is not easy to do so BE CAREFUL! There are wires running through the grommet and you do not want to damage them. I used a blunt screwdriver with some elephant tape over the end as protection for the wires, and pushed it through the grommet. I was then able to get under the glove box to feel the end of it. Once I was sure I could pull the cable through, I taped them to the screw driver and pushed it through again, removing them from the screwdriver on the glove box side and pulling them through.
I then routed the wires to the central console and from there, sideways under the carpet on the floor of the car just below the where it ramps up to the seat area and then up under the seats coming through where the airbag wires appear. I then connected everything up to test it before starting to fix things in properly...
The result ....nice toastie seats!
Happy that they were working, I was then able to work on getting the buttons into the central console. As I had bought the entire leather interior, the new console already had heater switches but they were obviously not compatible with the new system. What was good though is that the blank holes in the console were almost a perfect fit for the new switches (if you have the blanking plate you will still have the same holes).
remove the old switches (or blanking plate if you do not have switches)...
The new switch that came with my kit is virtually identical in size to the hole, but is 'square cornered'...
so, with a sharp stanley knife (the plastic is soft and thin) square off the 4 corners of the hole you have. Do not make it any larger, just square cornered.... one switch fitted and the other hole done.....
then just push the new switches in until the brackets click into place. Remember to do them the correct way up!
and then fit into the car and retest! here are mine working (orange light comes on when they are working)
This kit has two heat settings, rocking forward and back with 'off' being the level position.and there we have it, job done! Ok, so in summer when you fit them you might not appreciate it much.... but in February you will!
Apparently material seats heat up faster, so a good mod if you have those too....Wiring was nice and simple. Loom was made up of a Power wire (fused) from the battery and a ground which was connected to a bolt by the handbrake and then the switches and elements just plug into those. Of course the above ‘How to ‘ shows you how to fit the kit you have into civic seats, each ‘heated seat kit’ will need to have its instructions following very carefully when installing to make sure you complete the wiring as they state.
Good luck and enjoy the warmth
Addendum: I fitted these last summer and have been using them most days over the winter. They are superb! I was worried that they would not be warm enough, but they are great. Heat setting 1 takes about 5 mins to get to full heat and is lovely and warm. Setting 2 heats up faster but is too warm to have on for long.
I hope this is of use