
Does anyone know if the Exhaust manifold can be replaced without the subframe being removed/moved on a Civic UK 2006 Diesel 2.2 ictdi? I know it can on the uk accord but the civic is much tighter on space! I have discovered the monifold is cracked and must change it myself all help appreciated.:worms:

urbanarcher
Exhaust manifold replacement Civic UK 2006 Diesel 2.2 ictdi
urbanarcher
Discussion starter
17 posts
·
Joined 2014
- Add to quote Only show this user
Does anyone know if the Exhaust manifold can be replaced without the subframe being removed/moved on a Civic UK 2006 Diesel 2.2 ictdi? I know it can on the uk accord but the civic is much tighter on space! I have discovered the monifold is cracked and must change it myself all help appreciated.:worms:
12,837 posts
·
Joined 2009
I would be VERY surprised if it can be, there is basically no room back there!
135 posts
·
Joined 2014
how did you discover it was cracked?
fumes in cabin? or visual inspection or increased noise?
just wondered because mine has started to sound a bit noisier lately but i dont have any smell in the cabin! So wondered if telltale signs of crack can be seen from either above or below.
sounds a bit "tractorish" below 2k rpm and av fuel has dropped by about 5mpg
urbanarcher
Discussion starter
17 posts
·
Joined 2014
Tibsy - Mine has been mainly fumes in cabbin when standing still it is very slightly more noisy but not too bad. I was able to get under it with the bottom covers off and could just glimpse the drivers end of the manifold which was black and sooty so have made the conclusion that it is cracked.
Syx - Thanks for commenting i can see that space is very limmited hence asking. do you know what the Procedure/method is for removal of the manifold?
Has anyone changed this part? anyone have any service documents that migt help me out?
The engine mounts for this car seem to have a very long threaded ctr fixing does this enable you to lower the engine on the mounts?
I'm hoping that i can get this done myself as its £450 for the labour alone and i'm trying to save up for a house.
5,960 posts
·
Joined 2011
I had mine changed by Honda. They had the car for two days. I had a word with the mechanic that did the job and he said he had to remove the subframe and it was a **** of a job.
677 posts
·
Joined 2014
last one i done i used a engine crane,, put car on axle stands,, i held engine and gearbox on crane undone engine mounts dropped engine down a bit and rocked it forwards this gave me room to get hands in there, also remove the plastics under screen plastics helps for room. just got to hope you can undo the nuts that hold turbo to manifold.. otherwise removing driverside drive shaft and still using engine crane approach works pretty well, subframe is a total pain to remove.. this is just one approach
added note driverside shaft includes the solid piece in to gearbox splines, and remove exhaust from turbo flange underneath.
added note driverside shaft includes the solid piece in to gearbox splines, and remove exhaust from turbo flange underneath.
urbanarcher
Discussion starter
17 posts
·
Joined 2014
Civicnut: I heard something like that too!
Mike1967: well that is interesting as I thought of doing something like that but It does seem like a right pain especially if you need a long bar to break of any of the bolts! Can you do all of this without draining the box or disconnecting any sensors? What issues did you come across while doing this that I should look out for if I choose to take this method?
Has anyone on here got access to the official procedure from Honda?
Has anyone seen or put up a DIY for this job on a civic anywhere on the internet that I've missed?
677 posts
·
Joined 2014
Removal
1. Remove the engine undercover.
2. Drain the engine coolant.
3. Remove the under-cowl panel.
4. Remove the air cleaner housing assembly.
5. Remove the engine cover.
6. Remove the air flow tube.
7. Remove the two bolts (A) securing the brake fluid tank bracket.
8. Remove the bolt (B) securing the heat shield.
9. Remove the A/C line clamp from the bracket.
10. Raise the vehicle on the hoist to full height.
11. Remove the catalytic converter/exhaust pipe A assembly.
12. Remove the heat shields.
13. Loosen the bands (A) securing the turbocharger outlet hose and intercooler intake hose, and remove the intercooler intake hose (B), then remove the intercooler intake pipe mounting bolts (C).
14. Remove the intercooler intake pipe bracket (D), then remove the intercooler intake pipe (E).
15. Remove the turbocharger outlet hose.
16. Remove the intermediate shaft.
17. Lower the vehicle on the hoist.
18. Remove the three nuts (A), then remove the warm-up catalytic converter (B) from under the vehicle.
19. Remove the air flow pipe bracket (B), then remove the air flow pipe A.
20. Remove the breather hose (A) and vacuum hoses (B).
21. Remove the vacuum line (C) from the cylinder head cover.
22. Remove three bolts securing the cover.
23. Remove the sealing bolt (A) and water bypass hose (B).
24. Raise the vehicle on the hoist to full height.
25. Remove the turbocharger bracket (A), then remove the oil bypass pipe (B).
26. Remove the cover (A), then remove the exhaust joint (B).
27. Remove the turbocharger assembly, then seal the air inlet, air outlet, oil line hole, and water line hole with tape.
NOTE:
• To avoid damaging the turbocharger.
• Do not turn the actuator rod adjust nut.
• Do not touch the impeller.
28. Remove the breather pipe (A), air flow pipe B, and water bypass pipe (C).
29. Remove the exhaust manifold.
Installation
1. Install the exhaust manifold (A) with a new gasket (B) and new self-locking nuts (C), and tighten the nuts in a crisscross pattern in two or three steps, beginning with the inner nut.
2. Install the water bypass pipe (A), air flow pipe B, and breather pipe (C) with new gaskets (D).
3. Pour new engine oil into turbocharger oil line.
4. Install the turbocharger assembly (A) with a new gasket (B).
NOTE:
• To avoid damaging the turbocharger.
• Do not turn the actuator rod adjust nut.
• Do not touch the impeller.
5. Install the exhaust joint (A) with new gasket (B), then install the cover (C).
6. Check the bolt (A) and oil bypass pipe (B) for clogged. If they are clogged clean or replace the bolt and/or pipe.
7. Install the oil bypass pipe with new gaskets (C) and new washers (D).
8. Install the turbocharger bracket (E).
9. Lower the vehicle on the hoist.
10. Install the sealing bolt (A) with new washers (B).
11. Install the water bypass hose (C).
12. Install the exhaust manifold cover.
13. Install the vacuum line (A) to the cylinder head cover.
14. Install breather hose (B) and vacuum hoses (C).
15. Install the air flow pipe A with new gasket (B), then install the air flow pipe bracket (C).
16. Install the warm-up catalytic converter (A) with new gasket (B).
17. Raise the vehicle on the hoist to full height.
18. Install the intermediate shaft.
19. Install the turbocharger outlet hose, and align the mark (A) on the hose with the pointer (B) on the turbocharger, then secure the hose with the band.
20. Install the intercooler intake pipe (A) to the turbocharger outlet hose (B), then install the intercooler intake pipe bracket (C).
21. Loosely tighten the intercooler intake pipe mounting bolts (D). Align the mark (E) on the intercooler intake pipe and the mark (F) on the turbocharger outlet hose, and slide the turbocharger outlet hose over the intercooler intake pipe until the hose end contact the bulge (G).
22. Tighten the intercooler intake pipe mounting bolts, and secure the turbocharger outlet hose with the band (H), then install the intercooler intake hose (I), and secure the hose with band (J).
23. Install the heat shields.
24. Install the catalytic converter/exhaust pipe A assembly (A). Use new gaskets (B) and new self locking nuts (C).
25. Lower the vehicle on the hoist.
26. Install the A/C line clamp to the bracket.
27. Install the bolt (A) securing the heat shield.
28. Install the two bolts (B) securing the brake fluid tank bracket.
29. Install the air flow tube.
30. Install the engine cover.
31. Install the air cleaner housing assembly.
32. Install the under-cowl panel.
33. Install the engine undercover.
34. Refill the expansion tank with engine coolant, and bleed air from the cooling system with the heater valve open.
above in off honda data..
by leaving turbo where it is and just release the manifold on it own so unbolting it off the the turbo,, no long bars involved just spanner open end and ring,,, its just making enough room by moving engine forward all far as will go,
urbanarcher
Discussion starter
17 posts
·
Joined 2014
Mike1967 that is just amazing such a lot of information. Can everyone else see the pictures as I cant. Is it because of my post number or something silly?
Maybe you could pm me the pics or I could pm you my email and you could sent them over as many of the points refer to them. I can't thank you enough for your efforts.
Maybe you could pm me the pics or I could pm you my email and you could sent them over as many of the points refer to them. I can't thank you enough for your efforts.
urbanarcher
Discussion starter
17 posts
·
Joined 2014
I've tracked down the document it was difficult to find on-line but I've converted all to PDFs now with all images, so great to take under the car on the phone. I'll try and post it up!
urbanarcher
Discussion starter
17 posts
·
Joined 2014
6,275 posts
·
Joined 2012
I had my 2006 FN3 MoT'd last month @ Phoenix :honda: in Paisley and was also advised that my manifold was cracked.
The very helpful service manager told me that it's not a part that usually "fails", and should last the lifetime of the car, i.e. 10 years.
He also said that it was worthwhile contacting Honda UK, if your car has been well maintained and serviced at the regular intervals, as there may be a possibility of recompense.
urbanarcher
Discussion starter
17 posts
·
Joined 2014
Thanks Mike1967 I managed to find the images. where did you access that data online?
81 posts
·
Joined 2012
this is all interesting to me, I raised a post about this last year, and everyone seemed to tell me it gets done by Honda. This is my tale. . . . .
I got a sensor replaced and when I went to get the car, the bloke at Honda Durham said on the test drive, he had detected a slight manifold leak, and that this was not a problem as they had put it down for authorisation as a freebie repair.
I heard nothing at all back, when I contacted them, they said my car was NOT in the "range" of affected vehicles and instead offered me a free. . . . . .car wash ha ha ! After mentioning this on this site, a few people seemed to suggest their manifolds were replaced as a matter of course. I honestly didnt think their was anything wrong with the car, but my curiosity got me, I emailed HONDA uk, told them about the story, and simply asked what this "range" was that my 2.2 type S diesel was NOT in. The upshot is, the local Honda at Durham have me booked in on Thursday to do the job,which they say takes 5 hours. So thats a result for free. . . . .
677 posts
·
Joined 2014
they also require car to have been up to date on services by a vat registered garage.. the issue was the manifolds that crack were all welded ones from factory,, the part up date is a cast single piece manifold, if anyones car is not serviced to honda's standards as they see it they can refuse to replace manifold, in this case cheapest option is to weld it up properly like they should of done in first place, ie weld it then heat manifold up to dull red and let cool slowly, this relieves the stress in the welds. and should not crack again.
6,275 posts
·
Joined 2012
I've just received this e-mail from Honda UK regarding my enquiry...
"HONDA UK Info
To me Today at 11:34 AM
Thank you for contacting Honda UK.
We are sorry to learn of the reported fault with the exhaust manifold of your Civic.
There is an extension of the warranty up to 7 years or 125 000miles (whichever comes first) on Civic models from 2006 to 2010.
You vehicle is out of the time period as it has been first registered on 28/12/2006.
However we have escalated your request to Customer relations for further attention, as the car has been regularly serviced within the Honda dealership network.
They will respond back within 3 working days to let you know of the resolution.
Should you need to contact us back, regarding the same matter, please quote your unique reference number: hmeccC********.
Should you have further queries, do not hesitate to contact us back.
Kind Regards,
Denitsa Hristova
Honda Customer Service
_____________________
Honda Motor Europe Ltd.
Honda UK
Call 0845 200 8000"
Will let you know what they say.
677 posts
·
Joined 2014
thats the same response they give on timing chains as well. sometimes they will out of good will replace manifolds or in some cases agree to write off some of the bill to have it replaced at a dealers.. end of day a fair argument is, a exhaust manifold is life of car component and should be designed to last that long,,, so going by 7 years or 125.000 miles honda are saying their cars should only last this period then,,, this falls apart for them when their show rooms sell these cars as being bullet proof and good for 300.000 miles plus if serviced correctly. all you need is proof that a main dealer saying this as a sales pitch and you could then push honda with this fact,, either your cars last 127k and 7 years and this would be a major mess to honda to admit this, honda power of your dreams is their advertising stance,, hmmm power of your dreams but only for 125k or 7 years then.
6,275 posts
·
Joined 2012
I will be, if they agree to cough something up, especially as the car has just turned 8.
Only came to light at last MoT at a :honda: dealer, last few years I've had it MoT'd at independants.
Only came to light at last MoT at a :honda: dealer, last few years I've had it MoT'd at independants.
6,275 posts
·
Joined 2012
Honda UK exhaust manifold replacement under warranty
Just had a call from my :honda: dealer, Phoenix Honda, Paisley, and Honda UK have agreed to supply AND fit a replacement manifold !
:elefant:
Feel like I've won the lottery ! :lol:
Ftr, my car was first registered on 28/12/2006 by a Honda dealer and used as a demonstrator for seven months, before being sold to a company in July 2007. It has a full service history, although I was not asked to provide proof, first six were done by Gordons Honda, Bolton, following five by independents.
I bought the car from a private dealer in August 2012 with 94k on the clock and have recently clocked 120k.
Here's a copy of confirmation e-mail...
On Friday, 23 January 2015, 13:05, David Newport wrote:
"Good Afternoon,
As per our conversation, I have booked you in for the exhaust manifold to be replaced on the 30th Jan at 8.30.
Honda (U.K) has confirmed that this repair will be done as goodwill and will cover the cost of this repair.
Also Kenny has agreed to replace the brake fluid that you will supply on the day, we will require the vehicle for at least 6hrs.
Regards,
David Newport
Service Manager
Phoenix Honda
Phoenix Retail park
Linwood Road
Paisley
PA1 2AB
Tel - 0141 842 1011
Fax - 0141 842 1033"
Big :thumbsup: to Honda UK !
81 posts
·
Joined 2012
great news !!!!!! Let me know if they give you a print out of work done / or not !
6,275 posts
·
Joined 2012
I will, in fact will ask for a receipt of the work and post it on here.
Reckon it's saved me the best part of £1k !
Reckon it's saved me the best part of £1k !
391 posts
·
Joined 2013
This is very good support by Honda. The part should always have been built correctly in the first place of course, but even so, thank you Honda for backing up your product in this way. Many lesser companies do not.
5,960 posts
·
Joined 2011
Great news. They backed when my car was riddled with problems. Hence the reason why my next car will be a Honda and the one after that........
6,275 posts
·
Joined 2012
It is Mick, I'm well impressed with both :honda: Phoenix, Paisley and Honda UK.Great news. They backed when my car was riddled with problems. Hence the reason why my next car will be a Honda and the one after that........
Wasn't expecting them to foot the whole bill either, considering my car is beyond the extended warranty period.
Just goes to show, "If you don't ask, you don't get !"
5,960 posts
·
Joined 2011
I service the car now because it's getting old and I accept that if it goes wrong, I'll foot the bill. Fortunately, now I have a HDS for diagnostics and most (99%) other mechanical jobs I do anyway.
6,275 posts
·
Joined 2012
New exhaust manifold now fitted, courtesy of Honda UK. Phoenix :honda:, Paisley did have the car for two days though, on account of a leak they detected after initial fitment.
Here's a copy of the warranty...
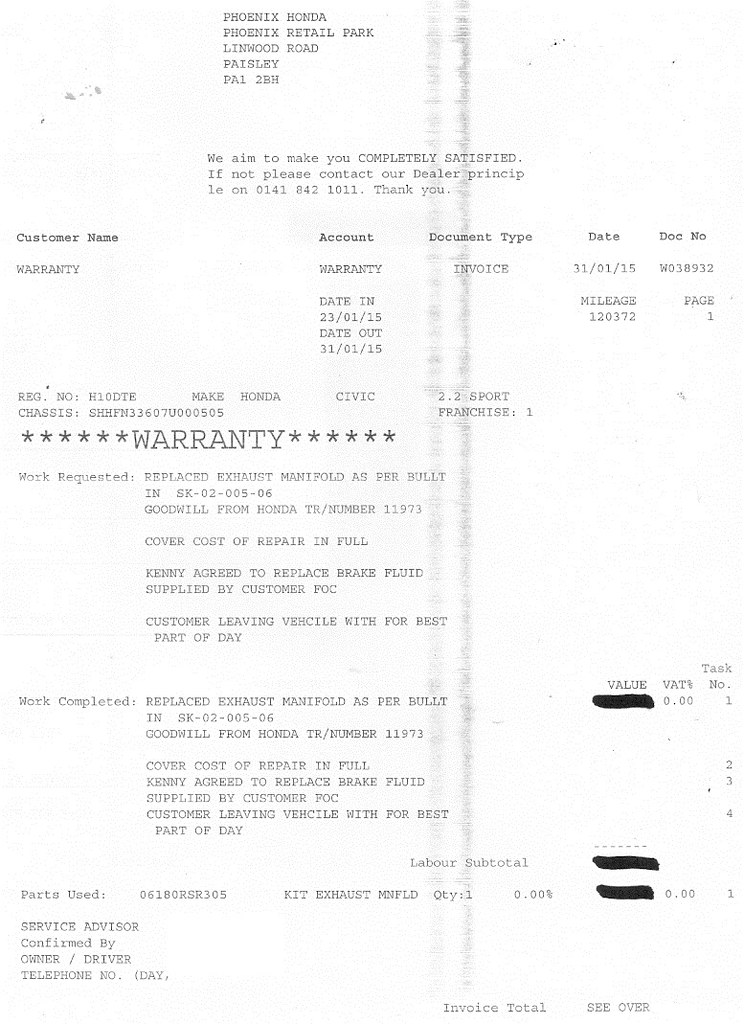
Here's a copy of the warranty...
99 posts
·
Joined 2011
Hey. That's my nearest dealer. I also think I have a dodgy manifold. Could you tell me exactly what you did to get them to fix it for free so I can just copy you?
At least I think it could be the manifold. I've got a 1.4 petrol 57 plate and it's blowing raspberries at me. Seen some fumes coming from under the car about 3 quarters along near the front.
At least I think it could be the manifold. I've got a 1.4 petrol 57 plate and it's blowing raspberries at me. Seen some fumes coming from under the car about 3 quarters along near the front.
urbanarcher
Discussion starter
17 posts
·
Joined 2014
I do think welding the original may be trouble as there is limited space to weld around some of the areas that look to be leaking on the one I removed.
-
?
-
?
-
?
-
?
-
?
-
?
-
?
-
?
-
?
-
?
-
?
-
?
-
?
-
?
-
?
-
?
-
?
-
?
-
?
-
?
- posts
- 2.5M
- members
- 109K
- Since
- 2006
A forum community dedicated to all Honda Civic owners and enthusiasts. Come join the discussion about performance, modifications, engine swaps, troubleshooting, wikis, VTEC, and more!


