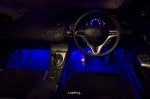

DIY – footwell lighting (just courtesy lighting)
This DIY explains how to make the necessary connexions in order to install RickHondaR`s Replica Honda footwell lighting kit and make them work together with the courtesy lights on the roof. When you open the car they light up and when you close the car or start the engine they dim until they turn off.
Video:
“Still don’t have it”
1º- You have to get your own RickHondaR`s Replica Honda footwell lighting kit.
http://www.civinfo.com/forum/sale-wa...hting-kit.html
The advantage on Rick’s kit is that it includes the cables already welded and they also include two scotch locks for fast mounting.
2º- Once you got your kit it would be a good idea to get a couple of male – female connectors, I’ve picked this:

We’ll also use some bridles (I believe this word is correct?)
3º- We have to unmount the plastic cover that goes beneath the steering wheel, to loosen it we first have to remove the triangular cover located at the side of the dash, where the driver’s door is. We unscrew the bolt and pull the cover downwards.

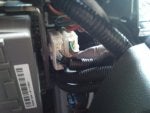
4º- We have to locate the connector with the necessary cables, the molex (plug) is located behind the fuse box, in the image below is the one marked with a red X.

"VISTA FRONTAL"=FRONT VIEW
"VISTA LATERAL"=SIDE VIEW
"PRESIONAR AQUI PARA SOLTAR"=PRESS HERE TO RELEASE
These are light blue and light green cables.
To unplug the connector it’s necessary to press the little plastic that holds the plug. See image.
5º- Once we have located the cables we have to remove the isolating tape and cut part of the tube containing the wiring. Then we have to use the scotch locks to bypass these two cables with our cables with their connectors. (see step 2).
How to use the scotch locks (I didn’t know!!)
6º- Now it’s time to connect the kit and check that it works fine (closing and opening the doors with our key).
7º- We remove the plastic cover located behind the glove box, in the passenger’s side, this is only held by some clips.

8º- Using a long piece of wire (like the ones used on fences) we pass it from the driver’s side to the passenger side behind the central console, more or less where the carpet ends, once it has been passed we attach the passenger’s light strip to one end of the wire and we pull until we get it on the other side.
9º- We have to secure the loose cables with some bridles to avoid rattles (I believe we have enough) and we proceed to stick the led stripes where we like. I did it this way

10º- We put all the panels back to their place and now we can enjoy our masterpiece!!!.
Hope you find it useful!!!
This DIY explains how to make the necessary connexions in order to install RickHondaR`s Replica Honda footwell lighting kit and make them work together with the courtesy lights on the roof. When you open the car they light up and when you close the car or start the engine they dim until they turn off.
Video:
“Still don’t have it”
1º- You have to get your own RickHondaR`s Replica Honda footwell lighting kit.
http://www.civinfo.com/forum/sale-wa...hting-kit.html
The advantage on Rick’s kit is that it includes the cables already welded and they also include two scotch locks for fast mounting.
2º- Once you got your kit it would be a good idea to get a couple of male – female connectors, I’ve picked this:
We’ll also use some bridles (I believe this word is correct?)
3º- We have to unmount the plastic cover that goes beneath the steering wheel, to loosen it we first have to remove the triangular cover located at the side of the dash, where the driver’s door is. We unscrew the bolt and pull the cover downwards.
4º- We have to locate the connector with the necessary cables, the molex (plug) is located behind the fuse box, in the image below is the one marked with a red X.
"VISTA FRONTAL"=FRONT VIEW
"VISTA LATERAL"=SIDE VIEW
"PRESIONAR AQUI PARA SOLTAR"=PRESS HERE TO RELEASE
These are light blue and light green cables.
To unplug the connector it’s necessary to press the little plastic that holds the plug. See image.
5º- Once we have located the cables we have to remove the isolating tape and cut part of the tube containing the wiring. Then we have to use the scotch locks to bypass these two cables with our cables with their connectors. (see step 2).
How to use the scotch locks (I didn’t know!!)
6º- Now it’s time to connect the kit and check that it works fine (closing and opening the doors with our key).
7º- We remove the plastic cover located behind the glove box, in the passenger’s side, this is only held by some clips.
8º- Using a long piece of wire (like the ones used on fences) we pass it from the driver’s side to the passenger side behind the central console, more or less where the carpet ends, once it has been passed we attach the passenger’s light strip to one end of the wire and we pull until we get it on the other side.
9º- We have to secure the loose cables with some bridles to avoid rattles (I believe we have enough) and we proceed to stick the led stripes where we like. I did it this way
10º- We put all the panels back to their place and now we can enjoy our masterpiece!!!.
Hope you find it useful!!!